

Yes, you can import an art inventory spreadsheet directly into most collection management systems. Start with the target platform’s official import template, save your working file as .XLSX, and add a column for image filenames before you upload anything. Run the file through the mapping and review screen first. That single step catches the formatting errors that would otherwise silently corrupt records.
Summary:
- Using the XLSX format is recommended because it preserves formatting and multi-sheet structure, unlike CSV which strips formatting and complicates descriptions.
- Accurate field mapping, especially for dates in YYYY-MM-DD format and unique Inventory IDs, is crucial for a successful import and avoiding validation errors.
- Running a cleanup pass to fix date, currency, and filename inconsistencies before uploading prevents most common rejection causes.
- Reviewing import previews and validation errors thoroughly minimizes silent record loss and prevents duplicate or incomplete entries.
- Automating large or recurrent imports benefits from batching, API or bulk migration, and standardizing filenames to reduce manual workload over time.
File Types and Templates: Getting the Groundwork Right
The file format you choose determines whether your import runs clean or stalls on row 40. Most platforms accept .XLSX, .XLS, and .CSV, but Artsy’s bulk import documentation recommends .XLSX specifically because it preserves cell formatting and multi-sheet structure. CSV files strip that formatting, which becomes a problem the moment a description field contains a comma or a line break.
If you work in Google Sheets or Apple Numbers, export as .XLSX rather than downloading a CSV. In Google Sheets, go to File, then Download, then Microsoft Excel (.xlsx). In Numbers, use File, then Export To, then Excel. Both preserve column formatting far better than a plain CSV export.
Decide early whether you’re using the platform’s own template or your existing spreadsheet:
- Use the official template when starting fresh or migrating from a system with a different field structure.
- Adapt your own spreadsheet when your headers already closely match the target system’s expected labels.
- Add an image filename column (commonly labeled
Image1,Image2, etc.) so artwork photos attach automatically during upload. - Package images separately in a folder or zip file that matches the filenames listed in your spreadsheet exactly, including file extensions.
Mapping Fields Correctly: Dates, Currency, and Duplicate IDs
Field-level accuracy is where most art inventory data migration efforts fall apart, not at the upload button. Artlogic’s import tool documentation lists exact field labels and formatting rules for a reason: a mismatched header or an inconsistent date format triggers validation errors that block the entire row, not just the flawed field.
Follow this sequence before you touch the upload screen:
- Match your headers exactly to the template’s field names, or be ready to map mismatched columns manually in the import interface.
- Standardize dates as YYYY-MM-DD (2026-03-14, not “March 14th” or “3/14/26”). Inconsistent date formats are one of the most common rejection causes.
- Strip currency symbols from price fields. Most systems expect a plain number (4500, not $4,500.00) and apply currency formatting on their own.
- Use consistent boolean values across the whole column, such as “yes/no” or “true/false” or “1/0.” Mixing formats in the same field confuses the parser.
- Assign a unique Inventory ID to every artwork. This single field is what prevents the system from creating duplicate records when you re-import an updated version of the same file.
- Format dimensions consistently (24 x 36 in, or 61 x 91 cm) and keep multi-value fields like medium or tags separated by a single consistent character, usually a comma or semicolon.
Pro Tip: Run a find-and-replace pass on your whole spreadsheet before uploading. Search for stray line breaks, double spaces, and mixed date formats. A five-minute cleanup pass catches more errors than any import tool’s error log will.
What Are the Steps to Import an Art Inventory Spreadsheet?
The actual upload is the shortest part of the process. Most platforms follow a version of this four-stage flow, and skipping the review stage is the single biggest reason imports go wrong.
- Upload your file and select either the platform’s template format or a “use my column headers” option if your spreadsheet already carries its own structure.
- Map unmatched columns. The system will flag any header it doesn’t recognize automatically. Assign each one to the correct field, and preview a handful of sample rows before you commit.
- Resolve validation errors. Common flags include malformed dates, non-numeric currency fields, and missing required values like artwork title or Inventory ID. Fix these directly in your spreadsheet and re-upload, rather than trying to patch individual records after the fact.
- Review and confirm. This screen typically shows a preview of how records and images will appear once imported, along with a count of rows to be added. Vendor support documentation consistently points to this review stage as the place to catch duplicate detection issues and parsing mistakes before they become permanent records.
- Import and verify. Once you confirm, check the final record count against your original spreadsheet row count. A mismatch almost always means several rows were silently rejected during mapping.
Artworksoft’s artwork profile management tools let you review and edit individual fields after import, which matters because even a clean upload usually needs a few manual touch-ups on condition notes or provenance details that don’t fit neatly into a spreadsheet cell.
Common Import Errors and a Troubleshooting Checklist
Most failed imports trace back to one of four issues, and all four are fixable in the spreadsheet itself rather than in the import tool.
- Encoding or file-type errors: Re-export your working file as .XLSX from the original editor rather than resaving a CSV, which often introduces character encoding problems with accented letters or special symbols.
- Date and number parsing failures: Convert the affected column to plain text first, then reformat every cell to match the template’s expected date or currency style.
- Image import problems: Double-check that every filename in your image column matches the actual file name exactly, including capitalization and file extension, and confirm the images are packaged the way the tool requires.
- Duplicate records: Set a unique Inventory ID for every artwork and decide in advance whether re-imports should update existing records or create new ones.
Pro Tip: Before you upload anything, run this five-point check: headers match the template, dates are YYYY-MM-DD, currency fields contain numbers only, every image filename has a matching file, and every row has a unique Inventory ID. That single pass eliminates the majority of rejected imports.
When Should You Automate Instead of Importing Manually?
Manual imports work fine for a few hundred records. Beyond that, batching and automation start paying off.
- Batch large collections into smaller files of a few hundred rows each rather than one massive spreadsheet, since most platforms cap records per import and smaller batches are easier to troubleshoot when something fails.
- Use an API or bulk data migration instead of repeated manual uploads if you’re migrating thousands of records from a legacy database rather than a working spreadsheet.
- Consider AI-assisted parsing for repetitive mapping tasks. Automation frameworks like the one demonstrated in Simular AI’s agent-s project show how software can handle repetitive column matching, though provenance notes, condition descriptions, and multi-line fields still need a human reviewer.
- Standardize image storage with a consistent filename pattern (InventoryID_01.jpg, InventoryID_02.jpg) before a large import, especially when multiple images attach to a single artwork.
- Move to a dedicated art inventory database once you’re re-running the same import monthly, managing multiple contributors, or losing track of which spreadsheet version is current. That’s usually the clearest sign spreadsheets alone have stopped scaling with the collection.
What Most Import Guides Get Wrong
Most advice on this topic treats the import as a single event: prepare the file, click upload, done. That framing misses where the real risk sits. The upload itself rarely fails. What fails is everything upstream of it, the date formats, the currency fields, the filename that doesn’t quite match, that only surface once the validation screen throws an error.
The conventional wisdom also overrates templates and underrates the review step. A template gets your headers right. It does nothing for a mixed date format buried three hundred rows down, or an Inventory ID that got duplicated during a copy-paste. The review and confirm screen, not the template, is where most real damage gets caught, and it’s the step readers skip most often because it feels like an extra click rather than a necessary one.
If there’s one priority worth taking from this: treat field-level consistency, not file format, as the real bottleneck. A clean .XLSX with sloppy dates will fail more often than a rougher file with disciplined formatting throughout. Fix the data before you fix the file type.
— Nealda
Skip the Cleanup: Import Straight Into Artworksoft
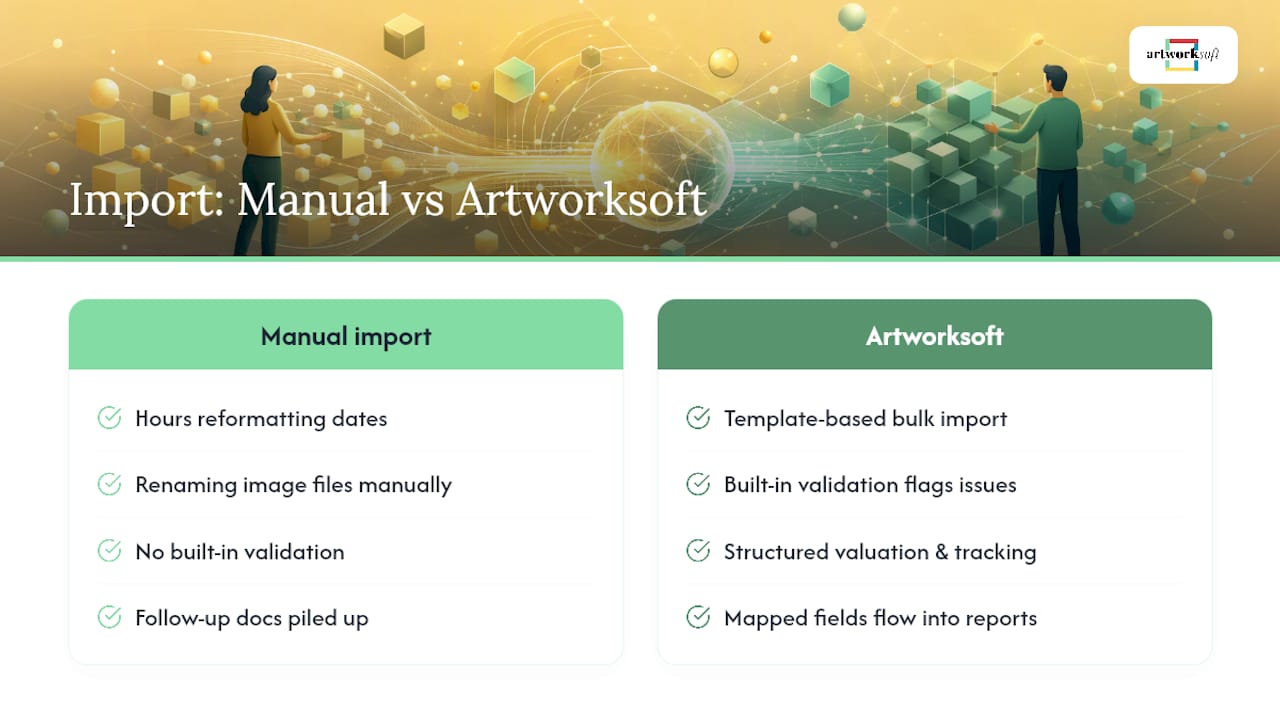
Spreadsheet imports usually mean hours of reformatting dates, renaming image files, and rechecking rows before you even see your collection in a new system. Artworksoft cuts that cleanup down by pairing a template-based bulk import with built-in validation that flags formatting issues on the spot, so you catch a malformed date or a missing Inventory ID before it becomes a stuck record.

Once your artworks are in, the work doesn’t stop at data entry. Artworksoft’s structured valuation tools, movement tracking, and one-click Certificate of Authenticity generation handle the follow-up documentation that usually piles up after a migration. Fields you mapped during import, like medium, dimensions, and provenance, flow straight into professional reports without retyping anything.
You can test the full import and inventory workflow on a free plan before committing to anything. Start with a small batch of records, run it through the mapping screen, and see how much manual cleanup it actually saves. Create your free Artworksoft account and upload your first spreadsheet today.
Official Import Templates and Support Guides Worth Bookmarking
Before you build your next spreadsheet, pull the exact field labels from the source rather than guessing:
- Artsy’s bulk import guide covers template downloads, recommended file types, and image filename conventions.
- Artlogic’s import tool documentation lists exact field labels and formatting rules for dates, currency, and boolean fields.
- Artworksoft’s guide on building an inventory system that works walks through template structure and field recommendations for a first-time setup.
- Artworksoft’s article on keeping records accurate covers post-import verification and ongoing documentation upkeep.
Sources
- Gallery guide to bulk importing artworks | Artsy Purchase Support
- Artworks Import Tool – Artlogic Support
- simular-ai/agent-s · GitHub